
Every September I get a version of the same call. The heat has finally broken, the power bill for August just landed, and somebody in Raleigh or Cary is staring at a number that is thirty or forty dollars higher than last year with no obvious explanation. Nothing broke. The house got cool, eventually. It just took longer and cost more than it should have.
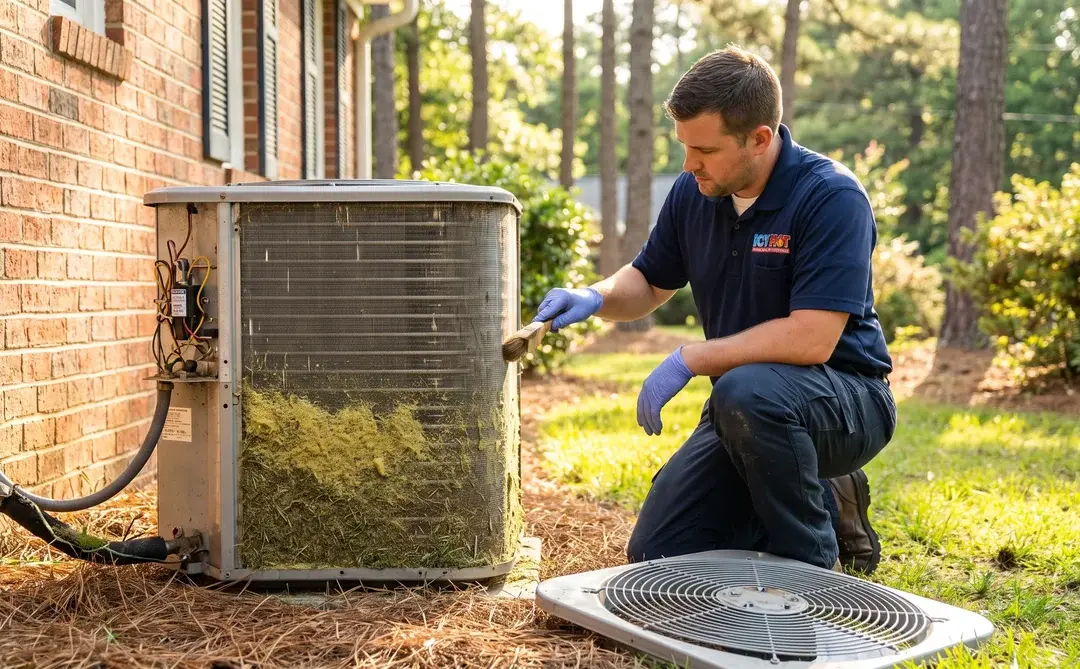
A fair share of the time, the answer is sitting in the side yard under a layer of pine pollen and grass clippings. Coils are the part of an air conditioner that actually does the work, and they are the part nobody looks at. They get dirty slowly enough that you never notice a bad day, only a bad summer.
Here is the part most articles about this skip: cleaning them is genuinely worth doing, but not for the reason the internet keeps repeating. The commonly cited figure is that dirty coils cost you thirty percent of your efficiency. The actual peer-reviewed measurement is a lot smaller than that for a healthy system, and a lot larger than that for a system that was already struggling. Which one you own changes whether this is a Saturday morning job or a phone call.
This guide covers both coils on a residential central air conditioner or heat pump: which one you can safely clean yourself, how to do it without destroying the fins, what the research actually says the payoff is, and the point where continuing on your own stops being smart.
TL;DR: Cut power at the outdoor disconnect first, then clean the outdoor condenser coil yourself with a soft brush, a non-acidic foaming coil cleaner and a gentle garden hose rinsed from the inside out. Leave the indoor evaporator coil to a technician, because high-voltage connections and refrigerant lines sit inches away. On the payoff, be realistic: Lawrence Berkeley National Laboratory measured a typical fouled coil at a 2 to 4 percent efficiency loss, not the 30 percent the internet repeats. A coil left twice as long runs 5 to 15 percent down, and a system that already had weak airflow can lose 10 to 20 percent or more. Questions on your own system? Call (919) 673-7667.
How Do You Clean AC Coils? The Short Version
Cut power at the outdoor disconnect, brush the loose debris off the outdoor condenser fins, apply a non-acidic foaming coil cleaner, and rinse gently from inside the cabinet outward with a garden hose. That is the whole job for the coil you can safely reach. The indoor coil is a different conversation.
Your system has two coils and they fail differently. The outdoor condenser coil dumps heat to the air outside, and it fouls from the outside in, with whatever your yard throws at it. The indoor evaporator coil absorbs heat from the air in your house, and it fouls from the inside out, with whatever gets past your filter. One of them is exposed to weather and sits behind nothing more dangerous than a fan grille. The other one lives inches from high-voltage connections and sealed refrigerant lines.
Lennox describes the outdoor sequence in one sentence: “Start by cutting power at the disconnect switch, clear away loose debris with a soft brush, rinse gently from the inside out, and use a fin comb to straighten any bent blades before powering back on.” That is a homeowner task if you are reasonably handy.
Trane takes the opposite position on the indoor coil, and I agree with them: “Leave the evaporator coil cleaning to the HVAC pros. Why? Because your HVAC system has some high-voltage components, and an untrained person can easily do damage to the system.” I will still walk you through what that job involves, because knowing what you are paying for is worth something.
How to Tell If Your AC Coils Are Dirty
Look at the outdoor unit. If you can no longer see light through the fins from the outside, or if a mat of pollen, cottonwood fluff and clippings has felted itself into the lower third of the cabinet, that coil is dirty. You do not need a meter for this one.
The indoor coil is harder, because you cannot see it without pulling a panel. The symptoms show up in how the system behaves instead. The house takes longer to reach setpoint on a hot afternoon. The system runs in much longer cycles, or stops cycling off at all. Humidity creeps up even though the thermostat is satisfied. And in the worst case, the coil ices over, which is the failure mode Trane names directly: “If the evaporator coil gets coated with too much dust and grime, it affects the airflow. This in turn can cause a frozen evaporator coil, which can create even more problems.”
If you are already seeing ice on the coil or the copper line, stop and read why your AC freezes up first, because a frozen coil has to thaw before anyone can clean or diagnose it. If the system runs continuously without cooling, that is a different branch, covered in why your AC runs but does not cool.
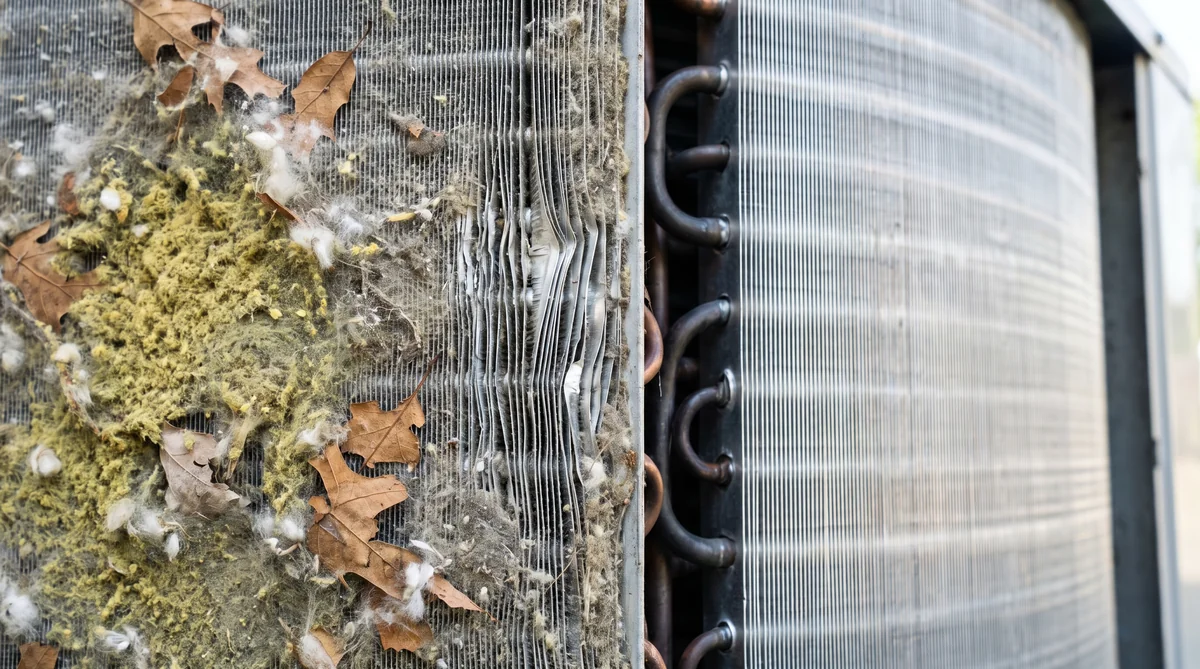
There is one more tell, and it is the one homeowners misread most often: a musty smell. EPA puts the mechanism plainly. “Research suggests that condensation (which occurs when a surface temperature is lower than the dew point temperature of the surrounding air) on or near cooling coils of air conditioning units is a major factor in moisture contamination of the system.” A cold, damp, dusty coil is a growth surface. If the smell is strong, the coil is part of the story and so is the drain underneath it, which I covered separately in how to clear a clogged AC drain line.
What Dirty Coils Actually Cost You
A typical fouled coil on a system with healthy airflow costs about two to four percent of efficiency and capacity, not thirty. That number comes from the only serious residential measurement anyone has published, and it is worth understanding before you decide how urgent this is.
In 2002, three researchers at Lawrence Berkeley National Laboratory, Jeffrey Siegel, Iain Walker and Max Sherman, published Dirty Air Conditioners: Energy Implications of Coil Fouling through the ACEEE Summer Study. They combined laboratory fouling experiments with modeling of real indoor dust concentrations. Their finding on the energy side: “The reduced air flows that result from coil fouling cause typical efficiency and capacity degradations of less than 5 %, however they can be much greater for marginal systems or extreme conditions.”
That last clause is where the money actually is. The same paper spells out the split. For a healthy system, “the pressure drop at the fouled flow is increased about 40%, the air flow is reduced by 5 – 10%, and the efficiency and capacity of the air conditioner decrease by 2 – 4%.” But for “a more marginal system (i.e. a system with insufficient air flow across the coil), these effects can be 10 – 20 % or even greater.” And a coil nobody cleans keeps going: after twice as long, the pressure drop has risen “by a factor of four,” producing “reductions of 10 – 20%” in airflow and “performance degradations (5 – 15 %).”
Compare that to the figure the category repeats. HomeAdvisor states flatly that “Dirty coils can increase the AC’s energy consumption by 30%,” with no study attached. I am not calling it impossible. I am saying that thirty percent describes a system in bad shape on several axes at once, not a coil with one season of pollen on it, and selling an annual cleaning on that number is selling the exception as the rule.
How Long Does It Take AC Coils to Get Dirty?
About seven and a half years for a typical coil to foul badly enough to double its own pressure drop, against a coil that is expected to last fifteen to thirty years. Your coil gets dirty two to four times over before it wears out.
The LBNL team modeled hundreds of combinations of filter grade, dust load, duct design and fin spacing. “The median fouling time was 7.1 years,” they report, and “The fouling time for the base case (MERV-2 filter, urban outdoor concentration, cycling air conditioner, dirty indoor environment, typical coil (4.7 fins/cm or 12 FPI), 10% filter bypass, typical duct penetration) was 7.6 years.” Their conclusion frames the gap: that is “considerably shorter than typical evaporator coil lifetimes of 15-30 years.”
Earlier work was harsher. Krafthefter and Bonne reported in 1986 that “a typical residential heat pump condenser coil will foul sufficiently to cause a 20 % reduction in performance over a 4 to 7 year period,” though LBNL flags that estimate as probably high because it assumed heavier indoor dust than later research supports.
The practical takeaway is the one variable the paper identifies as dominant: “The most important parameters in determining coil fouling times are the efficiency of the filter and indoor particle concentrations, with filter bypass and fin spacing as secondary effects.” Your filter, and how well it seals in its slot, controls the clock on your evaporator coil more than anything else you do. That matches EPA guidance to “Use the highest efficiency air filter recommended by the manufacturer of your heating and cooling system.” One odd detail worth knowing: LBNL found that “Fibers are responsible for 20 % of fouling, on average,” which is a polite way of saying carpet, bedding and laundry are one fifth of the problem.
Why Raleigh Coils Foul Faster Than the Averages
Those national fouling numbers assume an average indoor and outdoor dust load. The Triangle is not average on the outdoor side, and the condenser coil in your side yard is the part that pays for it.
Raleigh is the site of the state’s pollen monitor. The North Carolina Department of Environmental Quality Division of Air Quality runs its sampler “annually from late-February through mid-November,” collecting “for 24 hours, from 9 a.m. to 9 a.m. of the following day” at a site on Reedy Creek Road. That is nearly nine months of sampling, which is also nearly nine months of material landing on outdoor coils.
NC State Extension describes the local load in its March 2026 write-up on pine pollen season: “tree pollen production begins as early as February with species like juniper and maple,” with “tree pollen counts typically peaking between late March and early April.” Pine is the visible offender here, and the article notes that “pine pollen grains are two to three times larger and smoother than hardwood pollen.” Larger grains are less of an allergy problem and more of a coil problem, because they mat rather than pass through.
Add loblolly pine straw used as mulch, a long mowing season, and August humidity that turns dry pollen into a paste, and you get the condition I find on half the units I open in September. Trane has a specific recommendation that helps more in this region than most: use “river rock, pea gravel, or other rock” around the unit instead of “shredded wood chip mulch or pine straw,” because loose organic matter “can get sucked into the unit and create problems.”
The search data tells the same seasonal story from the other direction. Nationally, the query “how to clean ac coils” runs 1,300 a month in January and 14,800 in July. Almost nobody thinks about this until the system is already struggling in heat, which is precisely the worst time to discover a restricted coil.
How to Clean the Outdoor Condenser Coil, Step by Step
Kill the power at the disconnect box first. Not the thermostat, not the breaker alone if a disconnect exists. Lennox does not hedge on this: “No exceptions here. Before touching anything, shut off power to your unit at the electrical disconnect switch.” The fan can energize without warning, and the capacitor inside that cabinet holds a charge.
The disconnect is the small grey box mounted on the wall within sight of the unit. Pull the handle or the block out and set it on the ground where you can see it, so nobody helpfully restores power while your hands are in the coil.
From there the sequence is straightforward. Clear vegetation back first. Trane asks for plants “at least 2-3 feet from the unit on all sides” plus “a 5-foot clearance” overhead; Lennox asks you to “Trim back shrubs, rake away leaf litter, and maintain at least two feet of clear space on all sides of the condenser.” Then lift the top grille, which usually means four to eight screws, and set it aside with the fan wiring still attached rather than yanking it.
Brush before you wet anything. A dry brush lifts a pollen mat off in sheets; the same mat, once soaked, turns into paste and goes deeper. Bryant describes the chemical step the way I would: “Spray a high-quality, non-acidic foaming coil cleaner evenly across the coils. Let it sit for the manufacturer-recommended time to break down stubborn grime. If you are using a rinse-required cleaner, gently wash it away with a low-pressure water spray.”
Rinse from inside the cabinet outward. You are pushing debris back out the way it came in rather than driving it further into the coil. Then finish the job most people skip: straighten the fins. Lennox is blunt about why it matters. “Even a small patch of bent fins creates a measurable restriction in airflow.” Finally, “Allow the coils to dry completely before reattaching the panels and restoring power,” per Bryant. Budget most of a Saturday morning including drying time.
How to Clean the Indoor Evaporator Coil
My honest recommendation is that you do not, and I say that as someone whose incentive you should be suspicious of. So here is the reasoning rather than the conclusion.
The evaporator coil sits inside the air handler, behind a panel that is often sealed with mastic or foil tape, frequently in an attic or a crawl space. Within arm’s reach of that coil are line-voltage connections, a blower motor, a sealed refrigerant circuit under pressure, and a condensate pan that will happily flood your ceiling if you knock the drain loose. Trane’s warning about “high-voltage components” is not liability boilerplate. It is a description of what is six inches from your elbow.
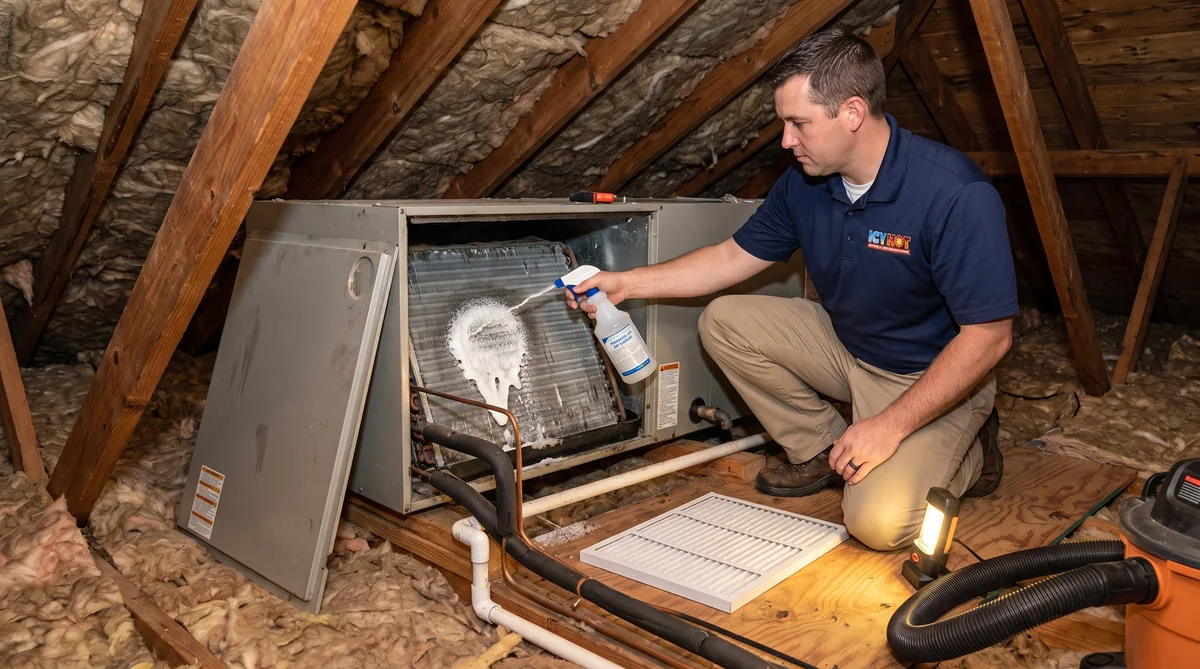
The work itself, when we do it, follows the sequence Trane publishes: “Turn off the HVAC system at the circuit breaker box,” “Remove the access panel,” “Use a soft brush or shop vac with a bristle brush attachment to gently loosen and remove surface grime,” apply cleaner, then “Inspect the coil for refrigerant leaks” and “Inspect the condensate drain pan and drain line and clean/clear clogs as needed” before closing it up. That leak inspection is a real part of the job, not a formality. An open coil is the only time anyone gets a clear look at it, which is why we fold it into an HVAC inspection rather than treating it as a standalone cleaning.
There is also a question of whether the cleaning accomplishes anything, which LBNL raises honestly: “it is unclear whether coil cleaning always removes deposited material, rather than just pushing it deeper into the coil.” A verified cleaning means checking that airflow actually recovered, not just that the coil looks better under a flashlight. If your system is old enough that the coil has been fouling for a decade, read how long an AC unit lasts before spending much on it.
What Never to Use on an AC Coil
A pressure washer is the fastest way to turn a maintenance task into a coil replacement. Aluminum fins are about as thin as a sheet of paper, and once they fold flat, rinsing does nothing because there is no longer a path through them.
Lennox states the failure mode exactly: “High-pressure water bends fins instantly and can push debris so far into the coil that no amount of rinsing will clear it. A gentle garden hose setting is the right call every time.” I have replaced condenser coils that were fine until somebody borrowed a neighbor’s pressure washer for an afternoon.
Chemistry is the second trap. Carrier lists what to stay away from: “Avoid using harsh chemicals, high-pressure water washers, abrasive scrubbing pads, or acidic solvents not designed for HVAC use.” Acidic cleaners do exist for coils and they work, but HomeAdvisor is right that acid washing “releases potentially harmful fumes, so only trained AC pros should apply it to exterior coils.” That is a truck-with-ventilation job, not a garage-shelf job.
Direction matters too, even with the right tools. Carrier describes professional technique as applying “air straight through the fins, never at an angle, to prevent bending the delicate aluminum,” and blowing “in the opposite direction of normal airflow (from the ‘clean’ side to the ‘dirty’ side).” The same logic applies to your hose. Straight through, and backward relative to how the air normally moves.
What Does Professional Coil Cleaning Cost?
Expect around $250 nationally for a coil cleaning, with most homeowners landing between $100 and $400. Which end you hit depends almost entirely on where your indoor unit lives and how long it has been since anyone opened it.
Those figures come from HomeAdvisor, updated in June 2026, and the spread inside them is more informative than the average. Outdoor condenser cleanings run “$75 to $200 and are quicker because the technician can easily reach the coil with a coil cleaner and a garden hose.” Indoor evaporator cleanings run “$100 to $700 and often falls on the higher end because the coil is hidden inside the air handler.” Attic and crawl space access is what moves that number, which is most of the Triangle’s housing stock.
The expensive rows in that table are the ones worth avoiding. A coil packed hard enough that the technician “may have to pull the coil out for a hands-on scrub” costs “$400 to $700.” An acid wash on an exterior coil runs “$300 to $350.” Both are the price of a decade of skipped maintenance, not the price of cleaning.
Against that, a routine condenser rinse rides along with an AC tune-up for $75 to $100, and our maintenance packages fold both visits into one annual cost. I wrote up the local pricing picture in more detail in what an AC tune-up costs in Raleigh. If your coil is past cleaning and into repair territory, AC coil repair and replacement is the page that covers what that looks like.
How Often Should You Clean AC Coils?
Once a year for the coils themselves, once a month for the filter that protects them. The filter interval is the one that actually controls how fast the indoor coil fouls, and it is the one most homeowners let slide.
ENERGY STAR puts both on the same checklist. “Inspect, clean, or change air filters once a month in your central air conditioner, furnace, and/or heat pump,” and separately, “Clean evaporator and condenser air conditioning coils. Dirty coils reduce the system’s ability to cool your home and cause the system to run longer, increasing energy costs and reducing the life of the equipment.”
The manufacturers cluster tightly around annual for the coils. Bryant: “It is recommended to clean your AC coils at least once a year.” Trane: “Cleaning the coil once a year should be enough.” Carrier ties it to a professional visit: “As a general rule, you should have an HVAC professional perform an AC maintenance check on your system at least once a year, preferably in the spring before the cooling season begins.” Lennox is the outlier, and in a pollen-heavy region the outlier is probably right, asking for outdoor fin cleaning “every three to six months or at the beginning of each major season.”
My own rule for Triangle homes: rinse the outdoor coil twice, once after pine pollen finishes in May and once after the mowing season ends in October, and have the indoor coil inspected annually. The spring visit is the one that matters most, and it is the same visit covered in the spring AC tune-up checklist. Heat pump owners should hold to the same schedule year round, since that outdoor coil works in heating season too.
When to Stop and Call a Licensed Technician
Stop if you find oil or a greasy film on the coil or the copper lines, if fins are damaged badly enough that a comb will not restore them, if there is visible mold or a persistent musty smell after cleaning, or if the system still will not cool once the coil is clean and dry.
Oily residue on a coil usually means refrigerant has been escaping with the compressor oil, and no amount of cleaning fixes a leak. Lennox uses nearly the same list for when to hand it off: “Severe dirt buildup that will not budge,” “Mold growth or unusual odors from your vents,” and “Fins that are too damaged to straighten.”
Mold in particular is not a cleaning problem, it is a moisture problem. EPA is direct about it: “If the conditions causing the mold growth in the first place are not corrected, mold growth will recur.” That usually points at the drain pan, the drain line, or duct leakage pulling humid air across a cold surface, all of which are covered under an air quality inspection rather than a coil wipe-down.
And if the system still runs long and cools poorly with a clean coil, the restriction was never the coil. That is when we start measuring airflow and refrigerant charge, which is AC repair territory. If you want a second opinion before you spend a Saturday on this, call us at (919) 673-7667 and describe what you are seeing. We will tell you honestly whether it is worth your morning.
Frequently Asked Questions
Written by Frankie Asfari, owner of Icy Hot Heating & Air Conditioning in Raleigh, NC. NATE-certified, NC HVAC License #L.34356.